Dropdown or Radio Buttons: Which Should You Use for Product Variations in WooCommerce?

Not every decision in eCommerce screams important, but some of the smaller ones, like how your customers choose a size or color, can quietly affect your sales. If you are selling products that have variability, you are likely to be stuck with default dropdown menus. They are simple, familiar, and get the job done. 

But are they the best option?

Many store owners have started shifting toward radio buttons and visual swatches. It’s not just a design choice. It’s about how people interact with your products. The easier and faster it is for shoppers to make a choice, the more likely they are to buy.

And that’s where things get interesting.

In this article, I’ll walk through the pros and cons of both dropdowns and radio buttons. We’ll look at where each makes sense, and why tools like WooCommerce Variation Swatches might help you bridge the gap between boring and brilliant.


What Are You Actually Selling?

—————————-

Let’s pause before we jump into the tech stuff.

If your store products come in various forms. If it could be jacket in 4 sizes and multiple colors, then you’re offering variations.  Each variation is a different version of same product. Customers will pick the right one before they can check out.

WooCommerce has a built-in way of handling this, and it’s fine. You set up attributes like size or color, and your customer selects from a drop-down list. Job done.

But when you’re selling something visual like fashion, cosmetics, or furniture, does a dropdown labeled “Sky Blue” or Lime” really show what you’re offering?

That’s the big question here.


Why Dropdowns Still Exist And Why They’re Not Always Bad

—————————-

Let’s be fair. Dropdowns have been around forever, and for good reason.

They’re clean.

If your product has a ton of options, say, 25 sizes or 50 shades, putting all of that on display can make a product page look like a jumbled mess. Dropdowns keep it neat and contained.


They’re universal.

Everyone knows how to use a dropdown. Even if someone’s shopping on a dusty old laptop from 2010, the dropdown will work just fine.


They work out of the box.

WooCommerce doesn’t require any extra plugins or custom work to set them up. You pick your attributes, add your variations, and you’re good to go.

So, yes, dropdowns are functional. But if something works doesn’t mean it’s perfect.


Where Dropdowns Start to Fall Short

Here’s the thing: we are living in a world of rapid feedback and visual cues. Apps like Pinterest or  Instagram. Customers don’t want to read labels to understand visuals; they only see what they are getting.

Problem 1: They Hide Options

If you bury your product variations in dropdowns, some customers may not even notice all the available choices. Out of sight, out of mind. And out of cart.

Problem 2: They Slow Things Down

Clicking, opening, scrolling, selecting. Multiply that by every variation a customer has to choose, and it starts to feel like work.

Problem 3: No Visual Guidance

When you’re selling something where appearance matters, a dropdown that says coral or midnight isn’t as helpful as a color swatch.


Radio Buttons and Swatches: Making It Visual

Radio buttons are the old-school HTML way of showing multiple options at once. But in the WooCommerce world, they’ve evolved big time.

Thanks to plugins like WooCommerce Variation Swatches, store owners can now show:

  • Color circles
  • Image thumbnails
  • Text buttons (like S, M, L, XL)
  • Even custom icons

And here’s the best part: all of it is clickable, easy to scan, and much more engaging than dropdowns.

Let’s be honest, people don’t want to “select” a color from a text menu. They want to see the color. They want to click the one that speaks to them.

That’s why swatches are winning.


But It’s Not Always That Simple

Okay, before you go installing swatches everywhere, there are a few caveats.

1. They take up space.

If you are offering 20 colors, this means you have 20 swatches on the store page. You will need to think about layout user interface to make sure it looks good.

2. You’ll need a plugin.

WooCommerce doesn’t offer this out of the box. So you’ll need to install something like the WooCommerce Variation Swatches plugin. It’s not hard, but it’s one more thing to manage.

3. You’ll need to prep your visuals.

No point in showing image swatches if the images are low quality or inconsistent. You’ll need to take time to prep your icons or color files so they look clean.


Let’s Compare in Real-World Terms

Let’s walk through a basic example:

You sell: Hoodies
  • You offer five color choices: black, olive green, wine red, dusty pink, and navy blue.
  • For sizes, customers can pick from small, medium, large, or extra-large.

Using dropdowns:

Your customer selects color → chooses from a list. Then select size → another list. Not painful, but not exciting either.

Using swatches:

All colors are visible as little color bubbles. Sizes show up as square buttons. No clicks to open anything. The customer clicks on olive,  image updates. They click large, and they’re done. fast, clear, satisfying.


When Dropdowns Might Still Be Better

Don’t feel pressured to use swatches for everything. Sometimes, a good old dropdown makes more sense.

  • Digital products with licenses (Basic, Pro, Enterprise)? A dropdown is cleaner.
  • Items with lots of variations (over 15)? Swatches can become cluttered fast.
  • Need quick setup and no extra plugins? Stick with the default setup and move on.

When Swatches Are the Smarter Move

If your store sells anything where color, texture, or visual style matters, switching to swatches is a smart bet.

  • Fashion
  • Home decor
  • Beauty products
  • Jewelry
  • Stationery

These are all areas where showing is better than telling.

And let’s not forget mobile shoppers. Tapping a big color swatch is way easier than dealing with dropdown menus on a small screen.


Some Quick Tips Before You Switch

If you are planning to switch from dropdowns to swatches, keep some important things in mind.

  1. Don’t go overboard.
    Don’t load too many swatches on same page. A clean and well-structured layout helps customers to find what they want without feeling overwhelmed.
  2. Make swatches readable.
    Use tooltips or labels. A swatch with no explanation can be confusing.
  3. Check mobile views: Before wrapping up your changes, always ensure to test the layout appearance on mobile devices. Most of visitors like to visit stores or websites through their phones. For this, everything runs smoothly.
  4. Stay consistent: Use the same style of swatches across your store. This keeps the design layout easy to use and professional.


Final Thoughts: What Makes Sense for Your Store?

If your product options aren’t very visual, like licenses, file formats, or long size lists, then dropdowns probably do the trick. They are easy and instantly set up and keep things simple.

If the appearance of your product matters, like its color, texture, or pattern.  It’s better to show those options right away. Letting people see and choose visually makes the decision process feel more natural and less like guesswork.

You don’t need to rebuild your entire store to improve how customers choose product options. A plugin like WooCommerce Variation Swatches can store attractive and easy-to-use. Though it takes time to set but, after this it will make natural browsing for everyone. And buyers can quickly make sense of their choices. They are more likely to follow through with a purchase.


Read More
Sanju August 4, 2025 0 Comments

Future of WooCommerce User Dashboards: AI-Personalization and Smart Navigation

When we talk about WooCommerce, the main focus is always on the product’s web pages, funnels for checkout, as well as payment methods. However, once a sale has been made, where do buyers go? They go to the section of the site where most store owners do not spend enough time contemplating their WooCommerce My Account Page. This is where customers who return look up their orders, download files, control address information, monitor points, and more.

With more stores shifting to providing returning customers with more options and more options for account management, the default page doesn’t suffice anymore. It’s basic. It’s effective, yes. But it doesn’t do much else. In the present, as AI devices are getting more prevalent and stores are learning about how customers use their dashboards, the future is beginning to appear different. We’re moving into a new era in which AI-based personalization and smart navigation will be standard and not an optional extra.

So let’s look at the future of shopping. It’s not just about the technology, however, but what it actually will mean for admins, users, and store owners who are trying to improve the shopping experience.


Why the Account Dashboard Matters More Than You Think

———————————–

The majority of people log on to their accounts to fulfill a purpose. It’s more than just browsing. They’re trying to discover something, fix the issue, or take up where they had left off. This moment of intent is powerful and important. If your dashboard gets in the way or gets in their way, it’s an opportunity lost.

The My Account page on WooCommerce usually ends up being an uninteresting list of hyperlinks. Orders, addresses, and account details. That’s it. It doesn’t tell anything about what users are interested in. It doesn’t offer suggestions or make things easier. In 2025, this kind of dashboard will not work anymore.

Customers expect smart interfaces. This isn’t because they’re spoilt and spoiled, but because it will save time. They’re looking to find out what’s important to them. If they’ve made a recent order, perhaps they’d like to follow the order. If you downloaded a file on the last day and would not like to comb through menus to locate the file again. This is where the concept of personalized navigation and personalization comes into play.


What AI-Personalization Can Do

Let’s make this process as simple as we possibly can. AI doesn’t mean that your dashboard is talking to users with robot voices or offering long-winded recommendations. It’s not an issue to be discussed.

AI personalization is the process of paying close attention to the habits and behaviors of the user. It then alters things the user is exposed to on account of the information it has gathered. If a user constantly clicks on the “Downloads” tab, maybe it will appear first the next time they sign in. If they made an order late last night, the dashboard could show that order at the top with no click needed.

Plugins that let you personalize the WooCommerce My Account Page are already beginning to accommodate this. Some let you display or hide tabs according to the user’s role. Some let you display banners that show only specific pages or actions. In addition, it’s not just about visibility but timing as well.

Imagine a user who has accrued reward points. If they log in the next session, a pop-up displays to inform users that “You’ve earned 120 points.. Here’s how you can use the items.” It’s not a magical event. It’s smart logic developed with a unique approach within the brain. It’s effective.


Smart Navigation Is About Doing, Not Searching

———————————–

Many retailers believe they’re helping by introducing more options on the dashboard. However, the more options you include, the more difficult it will be to find something. People don’t wish to comb through 12 tabs in order to find “Wishlist” or “License Keys.” They’d rather go in and take what they’ve come to do, and then get out.

Smart navigation is the process of making things easier. This is not done by removing options but by better organizing them. This could involve putting related items into sections that can be collapsed. It could also mean giving priority to the tabs most used and hiding tabs that people don’t click. This also implies the ability to let users search for items by their behavior.

Perhaps your shop supports both wholesale and retail buyers. Why should you show the identical options to all of them? By setting up a dashboard with a role-based structure, it’s possible to show one layout to regular buyers and another one to wholesale accounts. Reduced clutter. More value.

Certain plugins already allow you to assign roles to users on each endpoint. You can select which tabs display for what roles, and even which widgets or banners are displayed for them. The dashboard appears to be designed specifically for the user, not merely a template.


AI Can Recommend Content, Not Just Products

———————————–

Let’s not forget that customers don’t just come back to reorder. Sometimes they need support. Or guides. Or a license renewal. The dashboard is the perfect place to recommend these things, especially if the customer just completed a related action.

Say someone just bought a camera. On their next visit, the dashboard could show a banner linking to setup tutorials. Or maybe they downloaded a file last week, and they could see a link to the updated version. These small things make the account dashboard feel alive. Like it’s working in the background to help them.

AI recommendations inside the WooCommerce My Account Page aren’t just for upselling. They’re for building a smarter connection. You’re showing that your store is aware of the user’s history and that you’ve got something relevant to show them. That could be a product, a guide, or a form.


Design Still Matters: Layout and Interaction

———————————–

The many advanced features you can avail do not make sense if your dashboard appears like something from an Excel worksheet. The design is the primary element that determines the perception people get from using dashboards. It’s not just about looks but also the layout clarity, clarity, and layout, as in addition to the capacity to adapt.

Modern dashboard plugins provide an option to change the layout. Users can select which menus they would like to display. The menus will be displayed either on the left, right side, or at the top. You can decide what size banners to use. You can alter the dimensions of the icons, as well as how far apart labels are, as well as how big the font is. The aim is to make the dashboard look clean and simple to comprehend.

It is able to display information in various ways. Certain dashboards show information from users in tables. Certain dashboards use cards that have icons, as well as tiny amounts of text. Users are also able to upload avatars and alter the design of the dashboards they choose to use.

Banners are a major component within the previous. They’re not used only for decoration. The right banners can guide users to perform tasks that require a lot of time, for example, such as changing the passwords for account holders, downloading fresh files, or signing up for deals. Banners are able to be accessible only to those with specific roles, or connect them to specific areas, and track the frequency at which they click.


What’s Coming Next for Dashboard Features

———————————–

Looking ahead, there’s one clear direction: more control for the store owner, and a more intuitive experience for the customer.

We’re going to see more plugins and dashboard tools that let you create dynamic dashboards. Not just static links and pages, but dashboards that update based on data. Think activity summaries. Loyalty statuses. Account alerts. These things will appear automatically based on customer behavior.

And integrations will go deeper, too. Tracking tools like Google Tag Manager are already being used to monitor what users click inside dashboards. Store owners can see what tabs are popular, what banners get ignored, and what content gets viewed. This data can then be used to rebuild the dashboard for better results.

Eventually, we might even see dashboards that completely change based on season, product category, or account history. For example, a dashboard in December might highlight gift orders. In January, it might show the order history from the holidays. And if a customer hasn’t logged in for 90 days, the dashboard might show a special offer or reactivation message.


Wrapping Up

The WooCommerce My Account Page is no longer just a site to view the status of your previous orders. It’s becoming an essential hub. A custom control panel that is tailored to every customer. The more efficient the panel is, the more likely they will be to return to your store.

Artificial Intelligence-based Personalization and Smart Navigation aren’t just trendy. They’re intelligent next steps. They allow customers to save time, discover the information they require, and feel as if they’re getting something and not just being processed.

If you’re still using your default dashboard, now is the time to think about changing this. There is no need for custom code to build a smart dashboard. All you need is the proper tools, a small amount of setup, and an eye on what your customers do after purchasing.

The post-purchase experience is where loyalty truly begins. Your account dashboard is where you will experience that feeling every time.

Read More
Sanju July 27, 2025 0 Comments

How the WooCommerce Size Chart Guide Increases Customer Satisfaction

Online shoppers often hesitate at checkout when they aren’t sure which size will fit. Lack of reliable sizing information leads to abandoned carts, frustrated emails, and extra work handling returns. The WooCommerce Size Chart Guide steps in here: it gives clear, easy‑to‑access measurements that match each product’s fit. By using the WooCommerce size chart on your product pages, you build shopper confidence right from the start, cutting doubts and turning clicks into happy customers.


The Challenge of Finding the Right Fit

——————————

Many brands have their own size labels. What’s a “Medium” in one label might be “Large” elsewhere. That mismatch causes guesswork:

  • Customers buy multiple sizes “just to be safe”
  • They return the one that doesn’t fit, raising your return costs
  • Shoppers get annoyed by sizing surprises and may shop elsewhere

Without a WooCommerce size chart, visitors often abandon carts or leave frustrated reviews. They lack clarity on bust, waist, hip, or length metrics tied to your specific products.


How the Size Chart Guide Works 

——————————

The guide gives store owners a flexible plugin to build and display tailored charts. Here’s how it lays out:

Create and Assign Multiple Charts

  • Unlimited charts: Make as many guides as you need for different clothing lines or brands.
  • Product and category rules: Assign a chart to individual items or entire collections.

Display Options That Fit Your Theme

  • Tabs: Embed a chart under a “Size Guide” tab on the product page.
  • Popups: Show a button that opens a modal overlay—no page reload needed.
  • Shortcodes: Insert the chart anywhere you like (sidebars, footers, custom blocks).

Easy Custom Styling

  • Colors and fonts: Match your brand’s palette for buttons, headers, and table text.
  • Animations: Choose fade, slide, or zoom effects to keep the experience lively.
  • Image uploads: If you prefer a designed chart graphic, just upload it and skip manual formatting.

Boosting Confidence at Checkout

——————————

When a shopper sees precise measurements right beside “Add to Cart,” doubts melt away. The WooCommerce size chart:

  1. Provides clarity: Exact chest, waist, or inseam numbers eliminate guesswork.
  2. Speaks buyer language: Clear labels like “Hip circumference (cm/in)” make data easy to understand.
  3. Keeps shoppers on page: Popups prevent shoppers from leaving the product page, keeping momentum for customers.

As customers feel sure about their choice, they move through checkout faster, and you will see fewer abandoned carts.


Crafting Custom Size Charts for Niche Products

——————————

Every special item needs its own size guide. Picture hats, gloves, or corsets; each calls for different numbers. With the WooCommerce size chart plugin, you can whip up a chart for any product line. First, jot down the main measures: head size for hats, glove length from wrist to fingertip, or under-bust and waist for corsets.

Then, bunch similar products into one table. For instance, make one sheet for girls hats and another for guys. Link each sheet to the right category or item. That way, shoppers see only the guide meant for them.

Keep the notes simple and friendly. Show every number in inches and centimeters. Add a quick tip-say, Measure just above your eyebrows, they nail it the first time. By building these tight guides, you turn guessing into easy steps. Your niche fans will return less and buy again more.


Visual Guides: Using Images

——————————

Tables can share facts, but a well-timed image speaks louder. A single picture shows exactly where you mean, look here for the chest, there for the waist or inseam. Whip up a quick sketch with arrows and labels, then drop that graphic into your WooCommerce size-chart block.

Keep lines bold and letters large. Skip busy backgrounds-your chart must stay crisp, whether shoppers use a phone or a laptop. No fancy software needed; plugins let anyone drag, drop, and label in five minutes.

When your image is done, pick the Image option and upload. Place it in a tab or popup so customers can click it and look around without leaving the page. A clean visual cuts confusion and lets buyers nail the right size with one quick glance.


Cutting Returns and Lowering Support Tickets

——————————

Exchanges damage profits and jam the support queue. A solid WooCommerce size chart helps in three ways:

  • First, it slashes return rates because buyers who nail the right fit the first time rarely send items back.
  • Second, cutting happens when fewer shoppers email, What size should I buy? so that question frees up hours for your team.
  • Third, satisfied customers post more five-star reviews because the only surprise is how well the item fits.

Fewer mix-ups also lighten the warehouse load and help fulfillment teams ship orders correctly on the first pass.


Building Trust and Loyalty

——————————

Trust grows when you tackle a customer’s pain point head-on. A sizing chart lends that credibility by letting you:

  • Show expertise with a clear guide that proves you know clothes and what shoppers really need.
  • Deliver honesty from the start because no measurement is hidden every size sits right there in plain talk.
  • Encourage repeat buys as shoppers come back to brands that make figuring out fit feel almost effortless.

With that extra layer of care, a one-time buyer can quickly turn into a loyal fan willing to spread the word.


Best Practices for Your WooCommerce Size Chart Guide

——————————

To get the most from your product size charts plugin for WooCommerce, keep these basics in mind:

  1. Keep charts up to date by revisiting each guide every time a new style lands on the floor.
  2. List both metric and imperial numbers to cover US buyers and shoppers from around the globe.
  3. Highlight key spots by bolding waist, chest, and other crucial measures so they pop for anyone scanning.
  4. Run a mobile test: Pop­ups and tabs should look sharp on phones and tablets.
  5. Add a link in promo e­mails: Remind shoppers about the size guide so they feel sure before clicking through.

Each step makes customers feel informed and ready to buy. You can also read about how to add WooCommerce size chart to your store in more detail.


Measuring Success

——————————

Keep an eye on these numbers to see how the WooCommerce size chart is doing:

  • Return rate change: See how returns Before and After the chart compare.
  • Cart abandonment rate: Watch for fewer customers dropping off on product pages.
  • Support ticket volume: Count size questions that come in before and after the chart goes live.
  • Conversion uplift: Track sales growth on items that show the chart.

Review these figures regularly so you can tweak the chart and make shoppers even happier.


Conclusion

Add a simple WooCommerce size chart to your shop, and you tackle sizing worries right away, cut down returns, and boost sales. When shoppers find clear measurements in a handy tab, they feel sure about their choice and complete the purchase. That confidence usually shows up as glowing reviews, repeat visitors, and less money spent on handling returns. Implement the guide today, monitor your key metrics, and enjoy a smoother, more satisfying shopping experience for everyone.


Frequently Asked Questions

What is a WooCommerce size chart?

A WooCommerce size chart is a handy pop-up or table that shows customers important body measurements, waist, and hip-so they can pick the right size before buying.

How do I add a size chart to my WooCommerce store?

First, install the free Size Chart Guide plugin, then use the dashboard to build a chart, pick how it shows up-a tab, a popup, or a shortcode and finally link it to specific products or whole categories.

Can I upload my own size chart image?

Definitely. The plugin lets you upload a ready-made image, so you avoid the time-consuming work of setting up columns and rows by hand.

Will a size chart reduce returns?

For sure. When shoppers see clear sizing details, they guess less and choose the right size the first time, which cuts returns and costly exchanges.

How do I track the impact of my size chart?

Just watch return rates, cart drop-offs, help tickets, and sales numbers on pages that show the chart; those changes show you how well the plugin is working.

Read More
Sanju July 23, 2025 0 Comments

How to Set Conditional Free Shipping Thresholds in WooCommerce

Introduction: Why Conditional Free Shipping Matters

Offering free shipping is one of the most effective ways to boost online sales, but doing it blindly can quickly shrink your margins. That’s where setting conditional free shipping thresholds in WooCommerce comes into play.

Free shipping can make or break a sale in e-commerce. It is not just about giving away shipping for free—it is all about how strategically you offer free shipping to your customers. This is why the concept of a conditional free shipping threshold evolves. With the free shipping threshold approach, you can offer free shipping to your customers when certain conditions are met. The conditions that you define and set. Conditions like setting a minimum amount a customer must spend to get free shipping. With this approach in practice, you engage more customers, urging them to buy more, improving the average order value in parallel.

But not all free shipping offers are created equal. If you set your threshold too low, you risk eating up your profit margins. Set it too high, and you might drive customers away. In this blog, we’ll walk you through what a WooCommerce Free Shipping Over Amount is, why it’s important, and how you can set it up—including how to make it conditional based on user behavior, cart value, and more.


What Is a Free Shipping Threshold in WooCommerce?

————————————-

A free shipping threshold is a minimum purchase amount required for customers to qualify for free shipping in your WooCommerce store.
The examples of free shipping thresholds in WooCommerce are:
“Get free shipping on orders over $20.”
“Spend $800 and get free delivery!”
In WooCommerce, to set advanced conditions for free shipping, you must opt for a plugin. We will discover the ideal option in the later paragraphs.


Types of Free Shipping Thresholds You Can Set

But before that, let’s explore the types of free shipping thresholds:

  • Fixed Cart Total Threshold — Free shipping on orders above a certain amount.

  • Category-Based Threshold — Free shipping if a specific category of product is purchased.

  • User Role-Based Threshold — Different thresholds for wholesale and retail customers.

  • Location-Based Threshold — Conditional free shipping based on shipping zone or country.

Why Set a Free Shipping Threshold in WooCommerce?

————————————-

Setting a conditional free shipping threshold isn’t just about logistics—it’s a marketing tool that influences buyer behavior. Here’s why it’s worth setting up:

1. Boosts Average Order Value

When customers are just a few rupees away from free shipping, many will add extra items to their cart just to avoid the delivery fee. This increases your overall sales without any pushy upselling.


2. Improves Customer Satisfaction

With a free shipping threshold, you are setting pre-defined conditions for the customers to get an advantage. This is a way to bribe your customers, which everyone loves. Your customers know how much they must spend in order to receive the benefit of free shipping. Your clients will have a more positive and transparent buying experience and be more satisfied as a result of this straightforward communication.


3. Increases Conversion Rates

Asking for an additional shipping cost right at the checkout results in cart abandonment rates, which affect the overall conversions and sales. The friction at the checkout is reduced by a conditional free shipping threshold, which encourages the customer to meet the requirements.


4. Encourages Specific Purchase Behavior

By offering free shipping for certain products and categories, you encourage customers to buy such products. This is beneficial to apply to products that are high-converting and have a greater impact on your sales. By offering free shipping for such potential products, you ensure they are purchased by as many customers as possible.


5. Offers Competitive Advantage

Your customers always compare not just the major incentives but the minor ones as well. When you offer free shipping, unlike your competitors, you get a competitive advantage. The customers are more likely to purchase the same product from you with free shipping instead of from your competitors with shipping charges.


Best Way to Set Conditional Free Shipping Threshold

————————————-

Now that you completely understand the significance of conditional free shipping for WooCommerce, we will help you understand how to set a threshold for it.
You can set the threshold for offering free shipping based on these factors:

  • Total amount
  • Product quantity
  • Specific product and category
  • Based on user role
  • Based on country/region

To set conditions for all these aspects, coding is definitely the right option. You have to opt for a smart and efficient solution, and below is the solution mentioned.


How to Use a Free Shipping Plugin for WooCommerce

————————————-

The first thing you need to do is to get the WooCommerce Hide Shipping Method plugin. Once you purchase the plugin, these are the steps to follow:

  • Download the zip file of the plugin and upload it to the Plugin > Add New section

  • Once the plugin is uploaded, click on install and then activate it

  • After its activation, define the condition for which you want to offer free shipping

  • Manage all the settings like message settings, display settings, page settings, effect settings, design settings, and general settings

  • At the end, save the changes

  • Test whether the added free shipping functionality works or not

So, with these few steps, you can set conditions for different factors to offer free shipping to your customers and entire your store with all the benefits.


Conclusion

Shipping cost is not always beneficial for a WooCommerce store; sometimes, offering free shipping can also be beneficial. The benefits are guaranteed when conditions are pre-defined for offering free shipping. You can opt for a complex method of setting this threshold, which is through code, but you can also get the task done with a plugin easily.
So, better choose the convenient and effective method, which is through a free shipping method plugin for WooCommerce.

Read More
Sanju July 17, 2025 0 Comments

Create Multiple Product Sliders in WooCommerce: A Step-by-Step Guide

For a clear presentation look, you must organize your products within your WooCommerce store first, and this may be made possible through listing items in a static grid layout. Customers often scroll through many products, especially in stores with large catalogs. In such cases, product sliders are effective. They allow the display of selected items in a rotating, limited-space section on any page.

Product sliders help store owners control which products to show and where to show them. These sliders can be created to focus on different product types. For example, sale items, new arrivals, or category-based groups. As long as you have a good plugin, you can easily make and manage multiple sliders along with various content and setting options.

Within this guide,you will learn how to create and manage multiple product sliders, all with the help of a WooCommerce Product Slider plugin. You will learn about important settings to use and options to choose from when displaying sliders on your store.


Installation and Activation

———————–

First thing, you gotta install the plugin. Head over to your WordPress dashboard, open up the Plugins section, and hit “Add New.” If you’ve got the ZIP file, upload it right there. After that, press “Install Now.” When it’s done installing, just click activate, and it’s ready to go.

After activation, a new menu will appear under the WooCommerce settings titled “Product Slider.” This section is where all slider management takes place.


Creating a New Slider

———————–

To make a product slider, go to the Product Slider option under the WooCommerce menu. Click the Add New button. You’ll see a form pop up where you set the slider details.

The first thing you do is give it a name. This name won’t show up on your site — it’s just for you to keep track. So call it something like “Homepage Slider” or “Sale Items” or whatever fits.

Once you’re done setting everything up, the plugin gives you a shortcode. Just copy it. Then go paste it wherever you want — could be a page, a blog post, or even a widget. That’s it. Your slider shows up right there.


Slider Behavior Settings

———————–

This part of the plugin lets you control how the slider acts on the site. You’ll find stuff like autoplay, speed, drag settings — all the basic behavior things.

  • Auto Play
    Turn this on, and the slider will scroll through products by itself. Handy for banners or homepage sections where you want stuff moving without clicking.

  • Slide Speed (in milliseconds)
    This tells how quickly the slider jumps from one item to the next. Smaller numbers mean faster switches.

  • Autoplay Interval Timeout
    This is the gap between each auto slide. It should go well with the slide speed or it might feel off.

  • Pause on Hover
    If someone puts their mouse on the slider, it’ll stop moving. Gives folks time to read what’s there or click something.

  • Loop or Rewind
    Loop will start the slider back at the first product once it hits the end. Rewind will go backward. Pick whatever fits the look you’re after.

  • Touch and Mouse Drag
    Let users move the slider using their finger or mouse. Touch drag works for phones. Mouse drag is for the desktop. You can switch both on if you want.

These settings are important when creating sliders for different areas of the store. For example, autoplay may work well on the homepage but not inside product detail pages.


Selecting Products to Display

———————–

Each slider can be configured to show specific products. The plugin offers two options for choosing content:

  • Select Products: Manually pick individual products to appear in the slider. This is helpful for featured items or campaign-specific selections.

  • Select Categories: Choose a product category. All products under that category will be included in the slider. This method is more automated and updates when category items change.

Additional filters include:

  • Show Sale Products: You can only display products that are on sale within WooCommerce, while others don’t appear.

  • Hide Products that are Out of Stock: You can avoid displaying any item that is out of stock or cannot be purchased for any reason.

With these controls, your sliders can serve a specific purpose assigned by you. A category slider can stay updated without manual changes, while a curated slider can focus on specific promotions.


Product Order and Quantity Controls

———————–

In the next settings section, it is possible to control the number of products shown in each slider and their order.

  • Number of Products: Define how many products will appear in the slider. Use “-1” to show all available products.

  • Query Order: Select between ascending and descending order.

  • Order By: Choose the basis for sorting. Options include product ID, name, price, date, or sales count.

Examples of common use cases include:

  • Showing newest products first by selecting descending order with “Date”

  • Displaying best-selling products by choosing “Sales”

  • Sort your prices from how to low or from low to high

Adjusting these values allows for different sliders based on product performance or catalog age.


Add to Cart Button Customization

———————–

Each product shown in the slider includes an Add to Cart button. The plugin offers customization of its appearance.

1: Choose a color for the background of your button, whether it matches your store’s design or your liking.

2: Set whichever color you want for the text that appears on the button.


Using Shortcodes to Display Sliders

———————–

After completing the slider setup, save the changes. The plugin will provide a shortcode for the created slider. This shortcode can be found on the slider list page or inside the individual slider settings tab.

To display the slider:

  • Copy the shortcode

  • Paste the shortcode with three options, such as the page, post, as well as the widget.

You can drop the shortcode wherever you want the slider to show. That could be a page, post, or even a widget spot. Works fine in HTML blocks, Gutenberg, classic editor, or theme areas. No extra steps, it pulls the slider right away.


Creating Multiple Sliders for Different Use Cases

———————–

One of the main features of the Product Slider and Carousel plugin is the ability to create unlimited sliders. Each slider can have unique settings, product selections, and placement.

Example use cases:

  • Homepage Slider: Select featured products, enable autoplay, and limit to 5 items for visual impact.

  • Sale Page Slider: Filter only sale items, order by discount percentage or sales, and disable autoplay.

  • Category Sliders: Create separate sliders for each product category. Place each on the respective category page using shortcodes.

  • Sidebar Slider: Create a small product slider for the sidebar, showing only 3 to 4 items using manual product selection.

Each slider operates independently. This allows site owners to organize their product displays based on page content, promotions, or marketing needs.


Performance and Display Considerations

———————–

When you’re adding a bunch of sliders to your store, don’t forget about how your site runs and looks. The plugin works fine with WooCommerce, but it’s still smart to follow a few things to keep things smooth.

  • Avoid placing too many sliders on one page. It makes the page slow, and folks might miss the important stuff you want them to see.

  • Use product images of the same size. Consistent image dimensions improve the slider’s appearance and reduce layout shifts.

  • Test on mobile devices. All sliders should be checked for usability on smaller screens. Drag and swipe functionality should be verified.

  • Set autoplay speed carefully. Too fast makes it hard to follow. Being too slow may cause users to scroll past without noticing.

By following these points, the product sliders can contribute to better product organization and user navigation.


Final Summary

Store owners have a ton of control over how their products are displayed, simply if they have the Product Slider for WooCommerce. With this plugin, creating multiple sliders on your site is a pretty straightforward process. With the Product Slider and Carousel plugin, creating multiple sliders is straightforward. Each slider can be built with different content, design, and placement.

Installation is simple, and no coding is required. Products can be chosen manually or pulled from categories. Display order, button colors, and interaction settings can be adjusted based on goals. Once you are done configuring, shortcodes make it super easy to embed sliders on any page you want to, even if it is a section of the site.

By using multiple sliders, store owners can highlight specific products in different parts of their store. This helps structure the shopping experience and direct visitors toward relevant items. Proper use of the plugin leads to a more organized store layout and better product visibility.

Read More
Sanju July 7, 2025 0 Comments

Boost Local Conversions: The Magic of Geo-Filtering in WooCommerce

Imagine browsing an online store and seeing products irrelevant to your country, like winter coats in the tropics or region-locked services. Frustrating, right? For store owners, this misalignment drains resources and misses sales. Enter geolocation filtering, a WooCommerce feature that customizes your store to visitors’ locations using their IP addresses.

When your store detects where visitors are located, you can hide products, categories, or entire pages from irrelevant regions. This goes beyond simple blocking, it ensures shoppers only see what truly matters for their location.. The result?

Higher engagement, reduced bounce rates, and more local conversions. In this guide, we’ll explore how geo-filtering transforms scattered traffic into loyal customers without complex promotions or guesswork.


Understanding Geolocation Filtering in WooCommerce

—————————–

How does it work? Geolocation filtering checks a visitor’s IP address to find their physical location. When someone visits your WooCommerce store, their IP tells you their country or region. With this information, you decide what to show or hide, like removing products unavailable near them or highlighting local promotions.

For instance, if you sell digital services licensed only in Europe, geo-filtering blocks access for visitors from Asia. Or if certain products have shipping restrictions, they vanish automatically for unsupported locations. This precision ensures users only encounter viable purchasing options, streamlining their journey.

The process is seamless. No user input is required. Geo-detection happens in the background. Store owners set rules once (e.g., “Hide Product X from Country Y”), and the system enforces them universally. This eliminates manual adjustments and scales effortlessly as your audience grows.

Beyond relevance, geo-filtering protects your business. Restricting high-fraud regions reduces chargebacks, while compliance with local laws (like GDPR or regional bans) becomes automated. It’s a dual shield: enhancing UX while mitigating risks.

Critically, this isn’t a “nice-to-have.” In a global e-commerce landscape, localized experiences are expected. 74% of customers feel frustrated when content isn’t personalized to their location. Geo-filtering meets that demand directly within WooCommerce.


Key Features of Geolocation-Based Filtering

—————————–

1. Auto-Detection via IP Address

Geolocation relies on IP databases to pinpoint user locations without manual input. When a visitor arrives, their IP cross-references global databases to determine their country or region instantly. This accuracy ensures rules execute correctly, whether blocking a product or redirecting users.

2. Granular Restriction Rules

Create rules to hide specific products, categories, CMS pages, or your entire store based on geography. For example:

  • Block swimwear from cold-climate countries during winter.
  • Hide entire categories (e.g., electronics) from regions with import restrictions.
  • Restrict policy pages (e.g., shipping info) irrelevant to certain locations.

Rules can stack, letting you combine country bans with IP exceptions.

3. Custom Messaging and Redirection

When users are blocked, avoid dead ends. Display custom messages (e.g., “This product isn’t available in your region”) or redirect them to relevant pages (e.g., a country-specific landing page). This retains engagement instead of losing visitors.

4. Whitelisting and Scheduling

Add IP exceptions for VIP users (e.g., beta testers) to bypass restrictions. Schedule rules to run temporarily, like blocking a region during a local holiday sale.


How Geolocation Filtering Boosts Local Conversions

—————————–

Relevance drives action. If visitors see products, they can buy without hitting shipping or legal roadblocks. They’re more likely to convert. For example, a user in Canada finds snow tires instantly, while a visitor in Florida sees pool gear. This relevance shortens decision cycles.

Reduced friction equals higher trust. Imagine clicking a product only to discover it’s unavailable in your country. Geo-filtering prevents this by hiding non-viable options upfront. Customers appreciate the transparency, which builds loyalty.

Targeted promotions amplify impact. Use geo-rules to spotlight region-specific deals. A monsoon sale in Southeast Asia? Hide it from arid regions. This focuses marketing spend where it matters, lifting ROI.

Fraud prevention protects revenue. Block high-risk regions known for fraudulent transactions. One study shows geo-targeting reduces chargebacks by up to 30%. Fewer losses mean healthier margins.

Compliance avoids penalties. Automatically hide products violating local regulations (e.g., CBD items in banned states). This keeps your store legally secure without constant monitoring.


Setting Up Geolocation Rules: A Practical Approach

—————————–

Step 1: Define Goals

Identify what you want to achieve:

  • Block non-target regions?
  • Highlight location-specific products?
  • Comply with regional laws?

Step 2: Map Rules

Prioritize rules hierarchically. For example:

  1. Block high-fraud countries site-wide.
  2. Hide shipping-restricted products.
  3. Whitelist key IPs (e.g., partners).

Step 3: Customize User Experience

For blocked users:

  • Set friendly messages: “Check our [Region] store for local deals!”
  • Redirect to alternate pages (e.g., a blog on international shipping).

Step 4: Test and Iterate

Use VPNs to simulate global traffic. Verify that rules trigger correctly and messages display clearly. Refine based on user feedback.


Advanced Tactics for Maximum Impact

—————————–

Whitelisting Power Users

Exempt loyal customers, affiliates, or beta testers from restrictions. Add their IPs to a whitelist so they can access full content, turning advocates into brand ambassadors.


Scheduled Geo-Rules

Temporarily restrict regions during events:

  • Block non-local traffic during a flash sale.
  • Hide seasonal items post-holiday.
    Rules auto-expire, saving manual effort.

Behavioral Redirects

Redirect blocked users to:

  • Localized content (e.g., “For UK customers, click here”).
  • Alternative products (e.g., show raincoats instead of snow boots in tropical areas).
    This recaptures interest rather than losing it.

Geolocation Rule Types and Their Benefits

—————————–

Rule Type Use Case Example Conversion Benefit
Entire Website Block Restrict access from fraud-prone regions Reduces chargebacks, focuses server resources
Product Hiding Hide region-restricted items (e.g., alcohol) Prevents cart abandonment due to shipping errors
Category Restriction Block seasonal categories (e.g., winter gear in tropics) Highlights relevant inventory, speeds up browsing
Page-Specific Rules Hide local shipping info from international users Avoids confusion, directs users to correct resources
Whitelisting Allow beta testers global access Engages VIP users for feedback and advocacy
Scheduled Blocks Limit access during regional sales Creates urgency, prevents overcrowding


Best Practices for Implementation

—————————–

Start Small, Scale Smart
Begin with high-priority rules (e.g., fraud-prone regions or legally restricted products). Gradually add complexity like category bans.

Monitor Analytics
Track metrics pre- and post-implementation:

  • Bounce rates in targeted regions.
  • Conversion rates for location-specific pages.
  • User feedback via surveys.

Balance Restriction and Accessibility
Avoid over-blocking. Use analytics to confirm a region is genuinely non-converting before restricting it.


Common Pitfalls and Solutions

—————————–

IP Inaccuracy
Issue: Databases occasionally misidentify locations (e.g., routing through VPNs).
Fix: Use whitelisting for misflagged loyal users.

Over-Restriction
Issue: Hiding too much content alienates potential customers.
Fix: Regularly audit rules. For ambiguous cases, show a message instead of blocking (e.g., “Contact us for availability”).

Technical Glitches
Issue: Rules conflicting with caching plugins or themes.
Fix: Test in a staging environment first. Prioritize rules to avoid conflicts.


The Future of Localized E-Commerce

—————————–

Geolocation filtering is evolving beyond basic IP blocks. Expect AI-driven predictions (e.g., suggesting products based on regional trends) or integration with local payment gateways. As privacy regulations tighten, anonymized data will refine targeting without compromising security.

For now, geolocation WooCommerce has a proven tool to turn global reach into local results. By showing the right products to the right people, you cut through the noise, and conversions follow.


Conclusion

Geolocation filtering transforms WooCommerce stores from generic to hyper-personalized. It’s not about shutting doors; it’s about guiding visitors to the most relevant experience. By automating regional restrictions, you free up resources, comply with laws, and most importantly, boost local conversions. Start small: block one high-risk region or highlight a location-specific collection. Measure the uptick in engagement, and iterate. Your global audience is waiting. Make every visit count.

Read More
Sanju July 3, 2025 0 Comments

Enhance Customer Shopping Experience by Allowing File Uploads

Online shopping experiences are defined by how customers interact with your online store. Improved experiences also vouch for how easy the website is for users to navigate. This helps reduce cart abandonment. When the process is simple, users will complete the ordering process. WooCommerce stores can do this by allowing file uploads. This makes the shopping journey smooth and useful for the customer.

Stores that sell printed products, custom gifts, or personalized items can benefit from this feature. When customers can upload their own files, the order becomes simple and direct. In this article, store owners and developers can learn about the benefits of file uploads and explore some helpful plugins to make this feature work in their WooCommerce store.


Why Customer Experience Matters?

—————————–

Customer experience is key to running a successful online store. When shopping feels easy and clear, people are more likely to finish their orders. If the store is confusing or slow, many visitors may leave without buying.

Allowing file uploads helps remove confusion, especially for stores selling customized or made-to-order products. Customers can easily provide the exact file or image they want, which makes their order clear for both sides. This saves time and avoids back-and-forth emails after purchase.


Benefits of Allowing File Upload on WooCommerce Stores

—————————–

1. Better Order Accuracy

When customers can upload their own design, logo, or document, it reduces the chance of mistakes. The store owner receives the exact file that the customer wants. This is very helpful for print shops, personalized gift stores, and custom clothing businesses.


2. More Personalized Products

File upload features make it easier to offer personalized products. For example, customers ordering photo books or custom t-shirts can upload their own pictures. This makes the product more personal and meaningful.


3. Saves Time for Both Customer and Store Owner

Without file upload, the store owner has to send emails or call the customer to collect the required file. This adds delay and can cause confusion. File uploads during checkout or on product pages solve this problem. Everything needed for the order is gathered at the time of purchase.


4. Improves Customer Satisfaction

When shopping process is simple customers will satisfied by the shopping exprience. It helps you improve sale and boost customer retention. With features like file upload it allows you to improve the ordering process.


WooCommerce Plugins to Allow File Uploads

—————————–

Several WooCommerce plugins allow customers to upload files seamlessly. Here are some popular options with their main features.


1. WooCommerce File Uploader

The WooCommerce File Uploader plugin is a simple way to allow file uploads on product, cart, or checkout pages. It helps store owners gather files directly from customers when they place an order. You can easily enable the file upload WooCommerce on your eCommerce website.

Features:

  • Add file upload fields on product pages, cart, or checkout.
  • Limit the number of files a customer can upload.
  • Set file size limits to avoid large or unsafe files.
  • Customers can drag and drop files for easy uploading.
  • Store owners can view and download files from the order page in the dashboard.

2. File Upload for WooCommerce

The File Uploader for WooCommerce is another helpful plugin for file uploads. It offers more settings and controls to make the process better for both the store owner and the customer.

Features:

  • Add multiple file upload fields on the product or checkout pages.
  • Support for setting file types and size restrictions.
  • Option to make file uploads required or optional.
  • Customers can remove or replace uploaded files before placing the order.
  • Files are available in the admin order details for quick access.

3. WooCommerce Product Addons

It allows store owners to add extra options to their product pages, including file upload fields.

Features:

  • Add multiple field types like dropdowns, checkboxes, and text fields.
  • Customize file type and size rules.
  • Allow customers to upload files as part of personalizing their order.
  • Show extra costs for certain options if needed.


Conclusion

Enhancing customer shopping experience allows you to improves sales and conversion rate. You can allow customers to upload files during shopping which improves order accuracy and minimize confusion. Whether selling custom-made products or services that need customer input, file upload features are a smart way to improve the store. It helps store owners meet customer needs without confusion. A simple and clear process means better customer satisfaction and a higher chance of repeat sales.

Read More
Sanju June 29, 2025 0 Comments

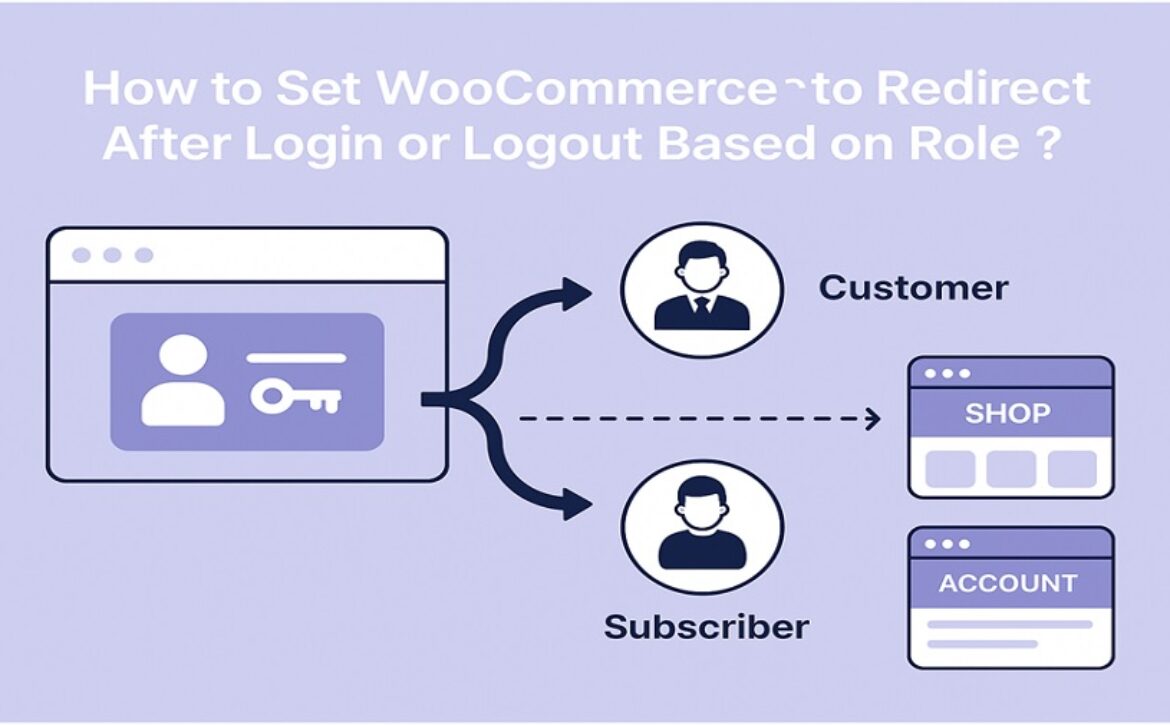
How to Set WooCommerce to Redirect After Login or Logout Based on Role?

Redirecting users based on their role in WooCommerce isn’t just useful. It’s important if you want to control how different users interact with your store. Instead of sending everyone to the My Account page, you can send customers, shop managers, or any role to different pages. That way you guide them where you want them to go right after login or logout.

The default behavior of WooCommerce doesn’t support role-based redirects. You’ll need a plugin to do that. One that gives you control over login, logout, and registration redirects. The WooCommerce redirect after login plugin gives you this function. It lets you redirect users by role, or even by name, and send them to any page you choose.

Once the plugin is installed, you can create rules. These rules let you choose what role gets redirected where. For example, customers can go to the Shop page after login. Your editors can go to the dashboard. And you can choose a totally different page for logout.

This kind of redirect helps stores that manage multiple types of users. If you run a vendor marketplace or subscription store, it’s even more important. You don’t want every user seeing the same landing page after login. That causes confusion and wastes time.

Setting it up doesn’t take long. You go to the plugin settings, add a new rule, pick the user role, and assign a URL. That’s it. Each rule can also be turned on or off depending on what you need. And you can create as many rules as required.

With the redirect after login WooCommerce feature, you’re not limited to WooCommerce pages. You can also send users to custom URLs. That could be a landing page, a form, or anything else inside your site.

So if you’re running a WooCommerce store and want more control after login or logout, use redirection by role. It’s a simple way to give users the right experience based on who they are.


Installing the Redirect User After Login and Register Plugin

———————————-

Installing the Redirect User After Login and Register plugin is required before setting up any redirect rules. Follow these steps to install it on your WooCommerce store.

  1. Download the plugin ZIP file from your WooCommerce account
  2. Go to WordPress admin > Plugins > Add New
  3. Click Upload Plugin and choose the ZIP file
  4. Press Install Now then Activate the plugin
  5. After activation, go to WooCommerce > Redirect Rules to start setting it up


How to Set Role-Based Redirects in WooCommerce

———————————-

To set role-based redirects in WooCommerce, first make sure the plugin is active. Then go to the redirection settings to begin creating your rules.

  1. Go to WooCommerce > Redirect Rules
  2. Click the “Add New Redirect Rule” button
  3. Enter a name for the rule (for internal use)
  4. Select the redirection type – After Login, After Logout, or After Registration
  5. Choose “User Role” from the condition options
  6. Pick the user role you want to target (like Customer, Subscriber, etc.)
  7. Set the destination page or enter a custom URL
  8. Save the rule to apply it

Repeat the process if you need different redirects for different roles.


Redirecting Users After Registration, Login, and Logout

———————————-

Redirecting after each user action is necessary to control how visitors move across your WooCommerce store. With this plugin, you set different pages for login, logout, and registration separately. New users can go to an onboarding page right after they register. Logged-in users can be redirected to the dashboard, shop, or any page that supports store activity. After logout, users may land on the homepage, a sales page, or a custom URL set for exit traffic.

No custom code needed for setup. Everything can be handled through the plugin settings. These actions work with user roles too. That means customers, subscribers, and admins can all be redirected to different places depending on what makes the most sense for their role.

Here’s a quick guide to set up redirects for each action:

  • Go to WooCommerce > Redirect Rules
  • Create a new redirect rule or edit an existing one
  • Select the redirection type: After Registration, After Login, or After Logout
  • Choose user roles or specific users for the rule
  • Set the destination page or input a custom URL
  • Save the rule and test to confirm it works as expected


Managing Multiple Redirection Rules Efficiently

———————————-

Managing multiple redirection rules is important for stores with different user roles and varied redirect needs. This plugin allows you to create and organize many rules in one place. You can name each rule clearly to identify its purpose quickly. Rules can be enabled or disabled without deleting them, making it easy to test or pause redirects when needed.

Having multiple rules means you can target specific user groups with precise redirects. For example, customers can be sent to the shop page while vendors go to their dashboard. This organized setup saves time and avoids confusion when handling complex redirection scenarios. The plugin’s interface keeps all rules visible and manageable, so you can update or remove rules as your store changes.


Conclusion

The ability to set custom redirects after login, logout, or registration in WooCommerce is not just a convenience feature. It’s a necessary function for stores that deal with different types of customers, vendors, admins, or contributors. The WooCommerce redirect after login plugin from Extendons gives full control over where users land based on their actions and roles.

Whether it’s a customer who needs to go straight to the shop or a vendor heading to their dashboard, sending them to the right place saves time and confusion. It also helps store owners guide traffic in ways that matter most to their store’s flow.

The plugin allows redirection based on user roles, usernames, and specific actions like registration or logout. Admins can manage multiple rules, assign names to each rule, and disable or enable them without deleting. You can also set redirects to store pages or custom URLs, making it highly flexible.

For stores with multiple departments or role-based customer service flows, this becomes very useful. You don’t need custom code or developer help to set all of this. Everything is handled inside your WooCommerce settings through a dedicated redirect rule interface.

Apart from login redirection, WooCommerce offers thousands of other plugins for different use cases. Some plugins handle product customization, others allow quote requests or offer booking systems. Each one serves a specific need and can be stacked together to run a full-featured online store.

WooCommerce works because it allows store owners to pick the tools they need. There’s no single way to run an online store. What works for one shop may not work for another. The plugin structure of WooCommerce supports this variety. Whether it’s redirection, customization, or location finding, each plugin serves a targeted function. Together, they create a full system.

Store owners should explore these options, pick the ones that fit their business goals, and use them to fix problems, not just add features. Always choose plugins with regular updates, clear documentation, and strong compatibility with your theme and version of WooCommerce. That keeps your store reliable and secure long-term.

Read More
Sanju June 11, 2025 0 Comments

How to Add Videos to Your WooCommerce Product Gallery – A Step-by-Step Guide

Adding videos to your WooCommerce product gallery can make your online store more engaging and informative. In WooCommerce, a product video gallery lets you showcase videos alongside images on your product pages. Using the official WooCommerce Product Video Gallery plugin (aka Add Featured Videos in Product Gallery), you can easily upload video files or embed videos from YouTube, Vimeo, and other platforms. In this guide, we’ll walk through why videos help, how to install the plugin, add videos (by upload or link), and some customization tips. By the end, you’ll know exactly how to build a rich, multimedia gallery for your products.


Benefits of Adding Videos to Product Gallery

——————————–

Product videos are a powerful way to boost customer interest and sales. Key benefits include:

  • Clear product demos: Videos let you show how a product works or looks in real life. This helps explain features more clearly than images or text alone.

  • Higher conversions: Shoppers who watch product videos are much more likely to purchase. For example, one study found 73% of consumers were more likely to buy after viewing a product video. In fact, viewers were up to 85% more likely to buy than those who did not watch.

  • More add-to-carts: Pages with videos see about 37% more “add to cart” conversions compared to pages without. Another statistic shows video viewers are 144% more likely to add an item to their cart.

  • Engagement and trust: Product videos help keep customers on your site. Over half of shoppers say product videos make them feel more confident about a purchase. Customers also tend to trust brands that offer detailed video demos.

Adding a video to your woocommerce product video gallery not only educates customers, but also showcases your professionalism, leading to higher engagement and sales.


Step-by-Step Guide Using the WooCommerce Product Video Gallery Plugin

——————————–

The WooCommerce Product Video Gallery Plugin makes it easy to attach videos to products. Here’s how to set it up and use it.

Installation

  1. Download the plugin: First, purchase and download Add Featured Videos in Product Gallery from WooCommerce.com. You’ll get a .zip file for the plugin.
  2. Upload and activate: In your WordPress admin, go to Plugins > Add New > Upload Plugin, select the downloaded .zip file, and install it. After installation, click Activate to enable the plugin.
  3. Verify settings tab: Once active, a new Featured Video tab will appear under WooCommerce > Settings. You can configure global video settings there, but we’ll focus on product-level steps next.

Uploading Videos

  1. Edit a product: In WooCommerce admin, go to Products > Edit the product you want to add a video to. Scroll down to the Featured Video section (usually below the product data area).
  2. Enable video gallery: Check the Enable gallery box to turn on video support for that product. (If you want a single main video, you can also check Enable Featured Videos to make it the primary thumbnail on shop pages.)
  3. Upload video file: Click the Upload Videos This opens the WordPress media picker, where you can upload a video file from your computer. The plugin supports common formats like MP4, MKV, AVI, MOV, FLV, and WMV. Select your video and add it. You can upload multiple video files, which will all appear in the gallery.
  • After uploading, you can set a thumbnail image for the video in the gallery if needed. This thumbnail shows before the video plays.
  • If you have several videos, use the Enable Sorting checkbox and enter sort order numbers to control their order in the gallery.

Embedding from YouTube/Vimeo

  1. Add video link: Instead of uploading a file, you can embed videos by clicking Add Video Link in the Featured Video section.

  2. Paste the URL: In the link field, paste the URL from a supported site (YouTube, Vimeo, Dailymotion, etc.).

  3. Save: The plugin will automatically fetch and embed that video into your product gallery. It will play the video in the gallery or use it as the featured video if you’ve selected it as the primary thumbnail.

Embedding is easy – just copy the share link from YouTube/Vimeo and paste it into the Link field. For example, choosing “Custom URL” and pasting a YouTube link will replace the default image with that video. Both uploads and embeds can be used together: you might upload a demo video and embed a customer testimonial video, all in one gallery.


Customization Tips

After adding videos, you can tweak how they appear and behave:

  • Gallery layout: Go to WooCommerce > Settings > Featured Video > General Settings. Here you can choose the slider style (horizontal or vertical) and enable autoplay, mute the video sound, or loop the video. For example, checking Autoplay will start the video automatically when a customer visits the product page.

  • Video controls: You can hide the play controls or disable full-screen if desired. These options let you simplify the interface.

  • Size and placement: Set the width and height for videos on both the shop page and product page. You might make videos larger on the product page for detail, or adjust dimensions to fit your theme.

  • Launch Video button: Under WooCommerce > Settings > Featured Video > Launch Video Button, you can enable a “View Video” or “Launch Video” button on shop pages. Customize the button text and color so customers know they can watch the video from the catalog or product listing.

  • Mix with images: The plugin lets you have both images and videos in your gallery. Customers can click through photos as usual, and a video thumbnail will appear among them. When clicked, it can open the video in a lightbox popup without leaving the page.

By adjusting these settings, you ensure the WooCommerce product video gallery fits seamlessly with your theme and provides a smooth viewing experience.


Tips for Effective Product Videos

——————————–

To get the most out of your product videos, keep these best practices in mind:

  • Be concise: Aim for around 30–60 seconds for a product demo. Short videos that highlight key features tend to hold attention better than long, rambling clips.

  • Use high-quality footage: Ensure clear, well-lit shots. Avoid shaky or grainy video – consider using a tripod and good lighting. Professional-looking clips build trust.

  • Focus on the product in use: Show your item from multiple angles, or demonstrate it solving a problem. For example, if you sell kitchen tools, show someone using the tool in a cooking scenario. This helps customers visualize owning the product.

  • Include a clear message and CTA: Tell viewers what to do next (“Buy Now,” “Learn More,” etc.). Good scripts and calls-to-action can guide shoppers toward purchase. Even a simple end screen with text or voice-over invitation to shop can be effective.

  • Add captions/subtitles: Many users browse with sound off. Adding captions or on-screen text ensures your message is understood even without audio. This is especially important for explaining product benefits or instructions.

  • Optimize file size: For self-hosted videos, compress files to reduce loading time. Alternatively, embedding from YouTube/Vimeo offloads bandwidth to those platforms, which can improve page performance.

Overall, make your videos helpful and engaging. A friendly tone and clear visuals go a long way. These tips will ensure your videos boost interest without frustrating viewers.


Conclusion

A WooCommerce product video gallery can take your eCommerce site to the next level by making products more engaging and informative. Using the official marketplace-approved WooCommerce video gallery plugin, you can install in minutes and then upload or embed videos to any product’s gallery. The result is a richer shopping experience — customers understand the product better, trust your store more, and convert at higher rates. By following the steps above, you’ll create a dynamic product page that combines images and videos seamlessly. Start adding videos today to bring your products to life and boost your sales with the WooCommerce product video gallery plugin.


Frequently Asked Questions (FAQs)

——————————–

Q: What is the WooCommerce Product Video Gallery plugin?

 A: It’s the official WooCommerce Plugin(also called Add Featured Videos in Product Gallery) that lets you display videos alongside images on product pages. This plugin adds a “Featured Video” tab in the product editor, where you can upload video files or paste video URLs. It then shows the video in the product gallery or as the main thumbnail.

Q: How do I add a video to my WooCommerce product gallery?

 A: First, install and activate the WooCommerce Product Video Gallery plugin. Then edit the product, scroll to the Featured Video section, and check Enable gallery. From there, either click Upload Videos to add a local video file, or click Add Video Link and paste a YouTube/Vimeo URL. The video will appear in the product gallery once saved.

Q: Which video formats can I use in the product video gallery?

 A: The plugin supports common video formats. You can upload MP4, MKV, AVI, MOV, FLV, WMV, and more. If using a self-hosted file, make sure it’s in a widely supported format like MP4. Embedding from YouTube/Vimeo also works for any content those platforms support.

Q: Can I embed YouTube or Vimeo videos in the WooCommerce gallery?

 A: Yes. In the product’s Featured Video settings, choose the “Custom URL” option (or click Add Video Link) and paste the YouTube or Vimeo link. The plugin will automatically fetch and embed that video into your product gallery. This allows you to host videos on those platforms while displaying them on your site.

Q: Will adding videos slow down my WooCommerce site?

 A: Video files can be large, but there are ways to minimize impact. If you upload videos, compress them or use efficient formats (like MP4). Better yet, embed videos from platforms like YouTube or Vimeo; only a small embed code loads instead of a full file. The plugin typically shows a thumbnail or “Play” button and only loads the video player when clicked. This means pages load normally, and videos play on demand, so site performance should remain fast.

Read More
Sanju June 1, 2025 0 Comments

WooCommerce Product Documents and Attachments: The Missing Piece for Selling Complex Products

Adding clear, accessible product information can be the difference between a sale and an abandoned cart. With WooCommerce product documents, you give shoppers everything they need to feel confident. This guide walks you through why product attachments matter, how to set up the plugin, and best practices for keeping documentation organized and helpful. By the end, you’ll know how to attach user guides, warranties, FAQs, and more—right on your product pages.


Why Document Access Matters

————————————–

When you sell items that need explanation—think electronics, machinery, or DIY kits—buyers often hesitate without instructions. Offering easy access to product documents builds trust and cuts down on support requests. Instead of emailing your team, customers click a tab or link to view a manual or spec sheet. That instant clarity keeps them moving toward checkout.

Providing WooCommerce product documents shows you care about the customer experience. It reduces doubt, answers common questions, and makes your store feel professional. Shoppers who find what they need quickly are more likely to complete their purchase and return for more.


Key Benefits of Adding Product Documents

————————————–

1. Fewer Support Tickets

When manuals and FAQs live on the product page, customers solve minor issues on their own. That means fewer emails and calls for your support team.


2. Better Conversion Rates

Clear instructions and specs help shoppers see exactly what they’re buying. Confidence drives sales.


3. Organized Information

Attach documents to individual products or whole categories. You keep everything in one place and save time when you need to update files.


4. Flexible File Types

Upload PDFs, DOCs, images, or link to external sources like Google Drive. You’re not locked into one format.


5. Enhanced Professionalism

A well-documented product page tells buyers you know your stuff. It sets you apart from stores that rely on images alone.

These points make the WooCommerce product documents Plugin a smart addition for any shop selling detailed or technical products.


How to Install the Plugin

————————————–

Getting started is quick and simple. Here’s what you do:

  1. Purchase the Extension
    Buy the “Product Documents and Attachments” plugin from your WooCommerce dashboard.
  2. Download the ZIP File
    Grab the file from your account page.
  3. Upload and Activate
    In WordPress, go to Plugins > Add New, click Upload, pick the ZIP, and hit Install Now. After installation, click Activate.
  4. Locate the Settings
    You’ll now see a Bulk Attachment menu under WooCommerce. That’s your control center for document rules.

With just a few clicks, the plugin is live. Next, you’ll set up global rules for attachments.


Setting Up Bulk Attachments

————————————–

Bulk Attachment rules let you attach files to many products at once. This saves time when you have shared documents across a range of items.

1. Open Bulk Attachment
Go to WooCommerce > Bulk Attachment. You’ll find two tabs: Bulk Attachment and Settings.

2. Create a New Rule
Click Add New. Give the rule a clear title—like “Electronics Manuals” or “Warranty Docs.”

3. Configure Attachment Settings

    • Status: Enable or disable the rule.
    • Description: A brief note for your reference.
    • Attachment Type: Choose between uploading a file or linking to an external URL.
    • Upload/File URL: Upload a PDF or paste a link to Google Drive.
    • Open in New Window: Decide if customers stay on the page or open docs separately.

4. Choose Products or Categories

    • Attachment For: Select “Specific Products” or “Categories.”
    • Selection Type: Include or exclude items.
    • Pick Items: Tick the products or categories this rule applies to. Leave blank to apply to all products.

5. Save Rule
Hit Publish. The documents will now appear wherever you’ve set them to show.

Bulk Attachment rules are perfect for shared guides, spec sheets, or compliance documents.


Customizing Plugin Settings

————————————–

After bulk rules, you can tweak how attachments display on the front end.

1. Go to Settings Tab
Under WooCommerce > Bulk Attachment, switch to Settings.

2. Plugin Status
Toggle the entire feature on or off without deleting rules.

3. Frontend Product Page Tab Title
Change “Product Documents” to “User Manuals” or “Specs.”

4. Display Location

    • Product Tab: Show docs in a separate tab next to Description and Reviews.
    • After Add to Cart: Place docs below the purchase button.

5. Shortcode Options

    • General Shortcode: Display a list of documents anywhere on your site.
    • Product-Specific Shortcode: Show attachments for one product only.

These settings let you match your store’s design and guide customers exactly where you want them.


Attaching Documents at Product Level

————————————–

For unique files, attach documents directly on the product edit screen.

1. Edit a Product
Go to Products > All Products and open the item you need.

2. Find the Product Attachment Tab
In the Product Data box, click Product Attachment.

3. Enable Download
Tick Enable Download to let shoppers grab the file.

4. Add Attachment Details

    • Name: A clear label, like “Installation Guide.”
    • Status: Enable or disable the attachment.
    • Description: Short info on what the file covers.
    • Type: Upload or external URL.
    • File/URL: Choose your PDF or paste a link.
    • Open in New Window: Yes or no.

5. Save Changes
Click Update. Your document is live on that product page.

Product-level attachments are ideal for item-specific specs, assembly instructions, or legal documents.


Using Shortcodes to Place Documents Anywhere

————————————–

Shortcodes give you flexibility beyond the product page.

  • General Documents List
    Use [product_documents] to show all bulk attachments on a dedicated page.
  • Product-Specific List
    Use [product_documents id=”123″] (replace 123 with the product ID) to display attachments for that item only.

You can drop these shortcodes into pages, posts, or widget areas. That means you could have a central “Documentation” page or add links in sidebars. Shortcodes make WooCommerce product documents work wherever you need them.


Tips for Clear and Helpful Documentation

————————————–

  1. Use Simple File Names
    “User-Guide.pdf” is better than “UG_v2_FINAL.pdf.”

  2. Keep Files Small
    Compress PDFs so they load fast.

  3. Add Descriptions
    A one-line summary helps shoppers know what to expect.

  4. Consistent Format
    Stick to PDFs for text docs and MP4 for video attachments.

  5. Update Regularly
    When specs change, replace old files to avoid confusion.

  6. Organize by Category
    If multiple products share the same manual, use a category rule to save time.

These small steps make WooCommerce product documents easier to manage and more useful to customers.


Troubleshooting Common Issues

————————————–

  • Documents Not Showing
    Check that the rule or product-level attachment is enabled.

  • Broken Links
    If you used an external URL, confirm the link is correct and publicly accessible.

  • Slow Page Load
    Large files can slow things down. Compress or host files on a CDN.

  • Tab Title Missing
    Make sure you’ve set a title under Settings > Frontend Product Page Tab Title.

Most issues clear up after a quick settings review or file check.


Conclusion

Adding WooCommerce product documents is the missing link for stores selling detailed or technical items. Clear, on-page attachments reduce support tickets, build buyer confidence, and improve conversions. Whether you use bulk rules or product-level settings, this plugin makes it easy to offer manuals, warranties, FAQs, and more—right where customers expect them.


Frequently Asked Questions

  1. Can I attach videos as documents?
    Yes. Link to video URLs or upload MP4 files just like PDFs.
  2. Will documents slow down my site?
    Large files can. Compress or host externally to keep pages fast.
  3. How do I remove an outdated document?
    Edit the rule or product attachment and click the trash icon next to the file.
  4. Can I display docs on category pages?
    Yes. Bulk Attachment rules let you assign files at the category level.
  5. Is coding required to use shortcodes?
    No. Simply paste the shortcode into any page, post, or widget area.

Read More
Sanju May 4, 2025 0 Comments